Dig Trench Safely: Expert Methods, Tools, and Regulations for Efficient Excavation
You can dig a trench safely and efficiently with the right plan, tools, and simple techniques. Choose the correct depth, slope, and dig trench tools for your soil and purpose, and you’ll save time while avoiding common mistakes like poor drainage or collapsing walls.
This post walks through how to dig trench step‑by‑step, what tools to use, and the safety and best practices that protect you and your project. Follow the guidance to tackle drainage, utility, or landscaping trenches confidently and get the job done right.
How to Dig a Trench?
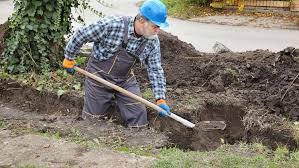
You will prepare the area, choose tools that match the soil and trench size, and apply efficient digging techniques to get straight, safe results. Focus on marking, utility checks, and using the right shovel or machine for the job.
Preparing the Work Area
Start by locating underground utilities. Call your local utility-locate service (811 in the U.S.) and wait the required time before you dig.
Mark the trench line with spray paint or stakes and string so you have a clear visual guide. Clear vegetation, remove topsoil into separate piles, and plan where the spoil will sit to avoid blocking access.
Check slope and depth requirements for your purpose (drainage, pipe, cable). Use a tape measure and level to mark depth every few feet. If the trench exceeds 4 feet deep or the soil looks unstable, plan shoring or benching and consider a pro.
Wear PPE: hard hat, safety glasses, steel-toe boots, gloves, and a high-visibility vest. Keep a shovel, first-aid kit, and a charged phone nearby. Limit access to the work zone with barriers or caution tape.
Selecting the Right Tools
Match tools to trench width and soil type. For narrow, shallow trenches in loamy soil, use a trenching shovel (flat blade and narrow throat). For compacted or rocky soil, add a pick mattock and a digging bar.
For long or deep trenches, rent a motorized trencher or small excavator. Specify trench depth and width to the rental shop so you get the correct machine attachments. Use a wheelbarrow or contractor bag to move spoil efficiently.
Bring measuring tools: tape measure, line level, and spade for clean edges. For pipe or conduit work, have a pipe laser or string line to maintain slope. Keep replacement blades and a sharpening file for shovels and saws.
Use waterproof markers and flags for safety and layout. Select anti-vibration gloves if you operate power equipment. If you expect unstable walls, include trench boxes or hydraulic shores in your tool list.
Trench Digging Techniques
Begin by cutting a clean edge along the marked line with a spade, then remove the topsoil in 2–3 inch lifts to preserve sod and root material. Place topsoil separately for later restoration.
Dig in short intervals and keep the trench bottom level using a straight board and level. For sloped trenches (drainage), measure fall per foot—typically 1/8″ to 1/4″ per foot—and adjust as you progress.
If the soil is layered or contains clay, break it with a mattock before prying with a digging bar. Remove loose material frequently to avoid working on an unstable footing. For deep work, install shoring every few feet of depth and use a ladder for safe entry and exit.
When using machinery, position the machine to throw spoil away from the trench edge and dig in passes: depth first, then widen. After reaching the final depth, trim walls and bed the bottom with sand or bedding material as required for pipe installation.
Safety and Best Practices
Identify soil type, locate utilities, control water, and use proper protective systems before you dig. Follow specific steps for testing, shoring, and PPE to reduce cave-ins, strikes, and hazardous atmospheres.
Assessing Soil and Terrain
Begin by classifying soil using visual and hand-texture tests and, when in doubt, get a professional geotechnical analysis. Distinguish between stable rock, Type A (cohesive), Type B (less cohesive), and Type C (granular) soils because the allowable trench slope or required protective system depends on that classification.
Locate underground utilities with a one-call (811) and physically verify marked depths where trenches cross services. Check surface conditions for nearby loads—vehicles, stockpiles, or equipment—that could increase collapse risk and maintain a safe setback.
Monitor groundwater and surface water; dewater or slope and bench the trench if groundwater will undermine the walls. Use atmospheric testing for oxygen, methane, hydrogen sulfide, and other toxic gases when trenches exceed 4 ft (1.2 m) or when contamination is suspected.
Protective Equipment and Precautions
Use protective systems—sloping, benching, shoring, or trench boxes—matched to trench depth and soil type. For trenches 5 ft (1.5 m) deep and deeper, OSHA-style protective measures are required unless a competent person determines no hazard exists.
Provide safe access and egress with ladders every 25 ft (7.6 m) of lateral travel and ensure ladders extend 3 ft (0.9 m) above the trench rim. Keep spoil piles and equipment at least 2 ft (0.6 m) from trench edges to prevent edge collapse.
Require hard hats, high-visibility vests, steel-toe boots, and fall-prevention measures near open trenches. Assign a competent person to inspect trenches daily and after rain, vibration, or other events; they must stop work and implement corrective action if conditions change.