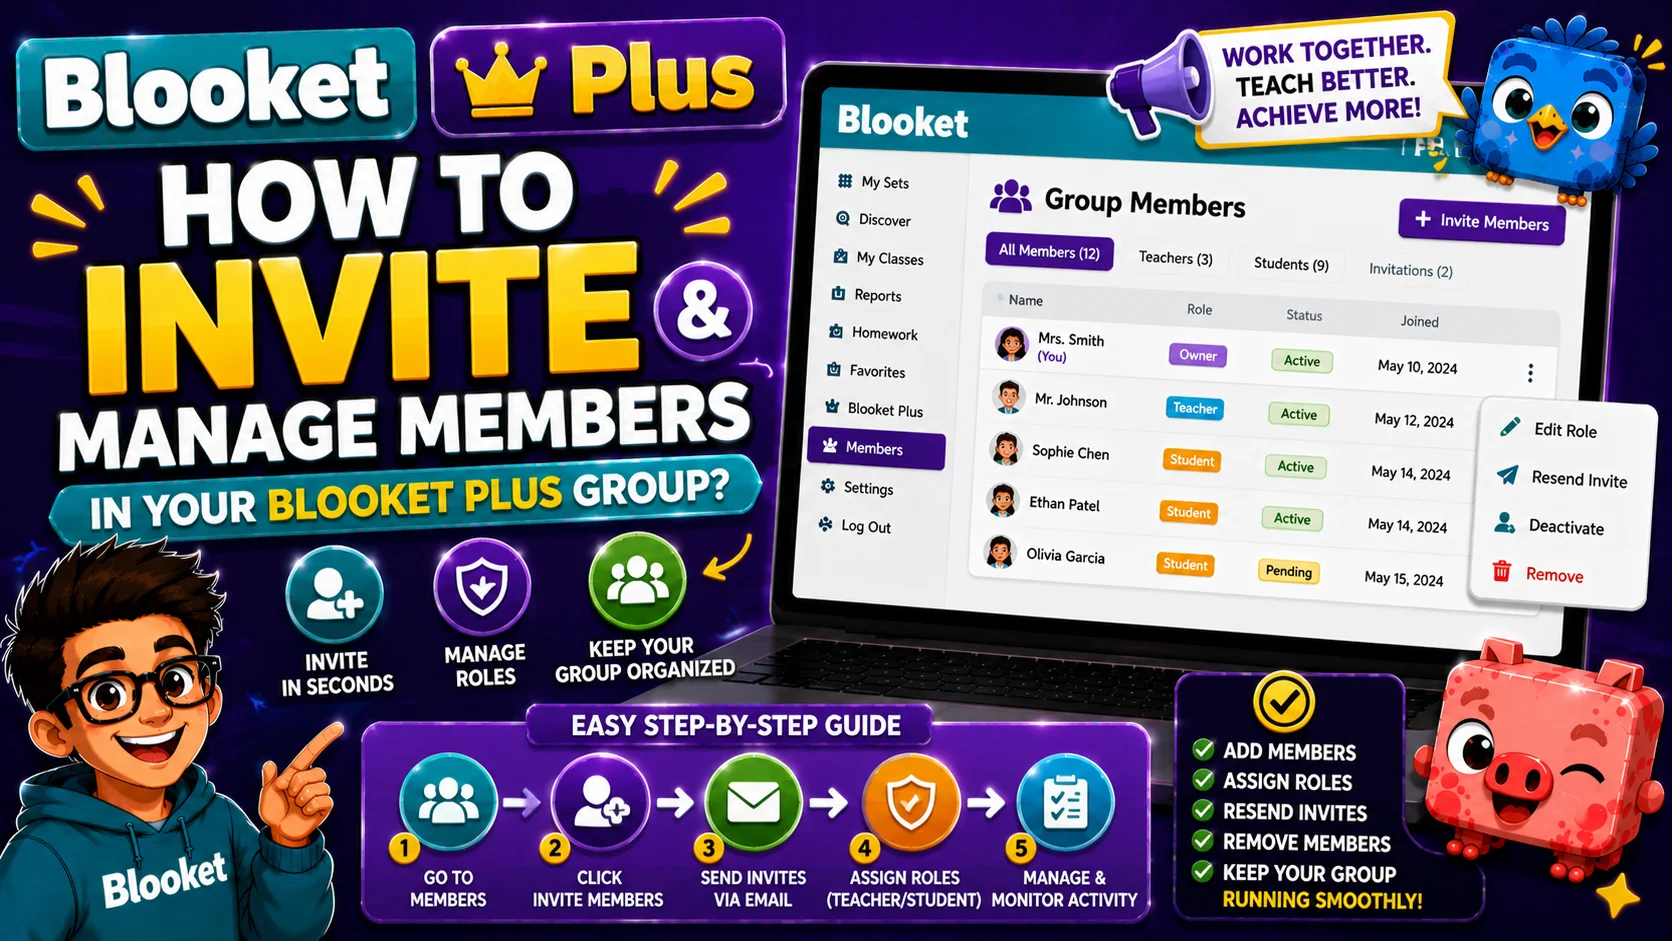
How to Invite and Manage Members in Your Blooket Plus Group?
Once your Blooket Plus Group Plan is purchased, the Group Admin’s next job is to distribute Plus access to the teachers in the plan.
Blooket Plus Group: Invite and Manage Members
This guide explains the complete member management process — inviting teachers, joining the group yourself, verifying Plus is active, removing members when needed, and resolving the most common invite problems.
Full Guide About → Blooket Plus Features
Step 1: Access the Group Plan Tab
Sign in at blooket.com using your Group Admin account — the account that purchased the Group Plan.
On the left navigation bar (the purple sidebar), click Group Plan. This opens the Group Plan management hub, which shows your current member list and the invite link at the top.
Step 2: Copy the Invite Link
At the top of the Group Plan tab, you’ll see your unique invite link — a URL specific to your group.
Click Copy to copy the invite link to your clipboard.
This link is persistent — it doesn’t expire after a single use. All teachers invited to your group use the same link. Share it with as many teachers as you have seats for.
Step 3: Distribute the Invite Link
Share the invite link through your preferred channel:
- Email — Send directly to each teacher’s school email
- Google Classroom announcement — If your admin account has access to a staff communication stream
- Slack, Teams, or staff messaging platform — Paste into your department or school channel
- Staff meeting — Share the link via a shared document or screen share
What happens when a teacher clicks the link:
- They’re taken to the Blooket join page for your group
- If they’re not logged in, they log in to their existing Blooket account (or create one if they don’t have one yet)
- They click Join Group
- Plus features activate on their account immediately
- Their name appears in your Group Members list on the Group Plan tab
Complete Guide About → Group Plan Reports
Step 4: Join the Group Yourself (Admin Must Do This)
⚠️ This step is the most commonly missed by new Group Admins.
Purchasing the Group Plan does not automatically give the Admin account Plus features. The Admin must join their own group as a member to activate Plus on their own account.
How to join your own group:
- From the Group Plan tab, click the “Join the Group” button (visible when the Admin has not yet joined).
- Alternatively, copy the invite link and paste it into a new browser tab, then click Join Group on that page.
- If you’ve already filled all your seats with other members and the Join button is no longer visible, use the second method (paste the link in a new tab).
After joining, your own account is listed in the Group Members section, and you have full Plus access.
All About → Blooket Group Plan Guide
Verifying Plus is Active for a Member
After a teacher joins the group, you can confirm Blooket Plus is active by:
- Checking the Group Members list — anyone listed under “Group Members” has Plus access.
- Asking the teacher to check for Plus-specific features in their account: the audio recording option in the question editor, the ability to create Folders, or the option to play a Plus-only game mode
Removing a Group Member
When a teacher leaves your school, no longer needs Plus, or joined the wrong group account, you can remove them to free up their seat:
- Step 1: Go to the Group Plan tab
- Step 2: Under the Manage Members tab, locate the member you want to remove
- Step 3: Click the remove or action option next to their name
- Step 4: Confirm the removal
After removal, their Plus features deactivate. The freed seat can be reassigned to a different teacher using the same invite link.
Full Guide About → Cancel Blooket Subscription
Troubleshooting Common Invite Issues
| Problem | Likely Cause | Solution |
| The teacher joined with the wrong account | They were logged into a personal account, not a school account | Remove the incorrect account from Group Members, have them log out, log into the correct account, and rejoin via the invite link |
| The teacher didn’t receive the invite | You tried to email through Blooket rather than sharing the link | Share the link directly via email or messaging — there’s no in-platform email system for invite distribution |
| Plus features are not visible after joining | Browser cache or display issue | Have the teacher clear the browser cache and reload, or try a different browser |
| No “Join the Group” button visible (for Admin) | All seats are filled, including the Admin’s | Paste the invite link in a new browser tab to access the join flow |
| The invite link stopped working | Seats are full | Check your Group Plan tab for seat count — you may need to expand your plan before more teachers can join |
What Happens at Renewal?
When your Group Plan renews (annually), all current Group Members retain Plus access continuously. You do not need to re-send the invite link at renewal — existing memberships carry over automatically.
If you want to change the seat count at renewal (add or remove seats), do so from the Settings tab in the Group Plan hub before the renewal processes.